Oftentimes when homeowners get ready to install concrete fencing, they find that the weather is not ideal. Everyone has had the experience of going out to complete a task on a sunny day and then quickly finding that it has started to rain. However, the good news is that it is possible to install your concrete fencing even during a light rain. In general, concrete fences are very easy to install, so with any luck the process will go smoothly and quickly.
What about Moist-Curing?
Many people don’t realize that concrete has the remarkable ability to harden underwater. The fact is that there is a process called “moist-curing” which actually makes concrete even stronger. Curing involves making sure that the moisture and temperature conditions are maintained exactly right for a certain period of time. However, in order for concrete to get stronger via moist-curing, it has to have the optimal curing time which is determined by a variety of factors including the size of the object you are working with, the weather, the mixture and type of cement materials. In short, it is a complex process.
Avoid Heavy Rains
If you are in the middle of a heavy storm, installing your fencing isn’t advised, as the final surfaces could end up rough due to missing cement particles. Another issue with rain is that the holes may not be steady. Plus, your holes will get full of water while you are trying to finish the job and this can be very frustrating. If you have to go this route, make sure your holes are very deep.
Installing Concrete Fencing in Cold Weather
Some people, getting ready to install their fencing, wonder if they can finish the job in cold weather and whether or not it will harm the quality of their final product. The good news is that it isn’t a problem to add calcium chloride to concrete when it wintertime, as it will still work as an effective accelerator.
It goes without saying that a sunny day would be the best time to install your concrete fencing. While the fence can be installed in wet conditions, it could lead to rotting in your fence, which is clearly something you don’t want.
Of course, one of the major advantages to a concrete post in general is that it can hold up in different weather conditions including rain. It is durable even in the most freezing temperatures! However, it is better to avoid the heavy rain until your installation job is complete.
This guest article is a contribution by Cole & Lambert Concrete, your nationwide concrete professionals.
Filed under Concrete Fences by . Comment. ![]()
Photo Courtesy: Concrete Forms
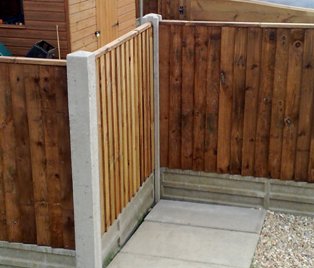
Fencing is done to create a barrier to prevent any outside access or block vision from passage. Fencing can also be done to provide visual sectioning of spaces. After all there is a saying “A good neighbor is a fellow who smiles at you over the back fence, but doesn’t climb over it.” Adding a block wall to your home can add privacy and provide noise reduction.
If you are looking for a sturdy wall protection a concrete fencing will be the best solution. Concrete block comes in various sizes and patterns to make the wall look attractive and will add to the beauty of your house. A concrete block fence can be quite expensive to build, as concrete blocks and the supplies needed are expensive. So if you want to save money you can get the supplies and make the wall yourself and save the labor cost. The below mentioned are the steps to build a concrete fence:
1. First thing is to decide the site and design. Pick the best spot where the fence would be most effective and installation won’t be difficult. Then decide the height and length of the fence and calculate how many blocks you will need. Get some 15% blocks extra in case some blocks get damaged.
2. Next step is to gather all the necessary tools to finish your fence, a trowel, mortar, hard lumber and wet concrete.
3. Now you need to create a frame for the wall. It should be both twice as wide and twice as deep as the thickness of the wall. Use a level to make sure the concrete frame is even.
4. Once the frame is set, pour the wet concrete and allow it to dry for 3-4 days. Use a leveler to make it even.
5. When it is dry, it is time to add concrete bricks. Use trowel to spread one-inch coat of mortar on top of footer. Now lay the concrete blocks along the top of footer. If your first block is perfectly placed, all others will line up with it.
6. Keep stirring the mortar to keep it from drying and keep a distance of a quarter inch between blocks.
7. Mortar three or four blocks outward from the corner or end. Check with a level and tap them into place.
8. Repeat the same for the other end of the wall. Once that is done lay a string from one end to other and use this string to complete the first line of the blocks in straight line.
9. Repeat all the above steps for each line of blocks till you reach the desired height.
10. Finish off the top by putting concrete in the holes with a trowel and then smooth the concrete.
Nancy Rorie is a blogger who writes on led stripe lights, solar panels, eco-friendly and other household products.
Filed under Concrete Fences by . Comment. ![]()


